


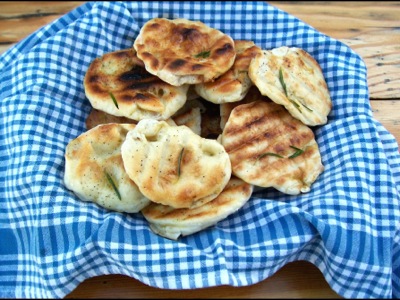
Susan's Grilled Flatbreads
Freely use these recipes for your enjoyment, but please do not republish.
Please note:
If you don't have a stand mixer or would just prefer to make the dough by hand, see my pizza dough page. The pizza dough recipe is very similar to one below and may be used in place of the Flat Bread Dough.
Flat Bread Dough
This recipe yields about 25 small flat breads
- ½ cup warm water (100-110 °F)
- 1 teaspoon brown sugar
- 2 teaspoons active dry yeast
- 1 lb. 8 oz. bread flour (about 4¾ cups)
- 2 teaspoons Kosher salt
- 2 teaspoons brown sugar
- 4 teaspoons extra virgin olive oil
- 1¼ cups warm water
- Measure the ½ cup of warm water in a measuring cup (Don't use warm water from the tap). Gently stir in one teaspoon of brown sugar and yeast. Let sit until foamy. If the kitchen is cool, you can place the cup in a small bowl of warm water to keep the yeast cozy.
- Meanwhile, measure the flour, salt, 2 teaspoons brown sugar, and oil into the mixer bowl and attach it to the mixer along with your dough hook.
- When the yeast is ready, add it with the water to the mixer bowl. You can do this with the mixer running on Speed 1, if you are very careful not to let the measuring cup touch the dough hook! To play it safe- don't turn it on until you have added all of the ingredients.
- Mix on Speed 1 for about 10 minutes. After a minute or so, you can turn off the mixer briefly to scrape the sides of the bowl and dough hook with a spatula. This is not always necessary, but will speed up the process of incorporating all the ingredients. After the first couple of minutes, check the dough for moisture content. If it feels too dry, add a little more water. If the dough feels too dry, add a little more flour.
- After 10 minutes, turn the mixer off and remove the dough hook. Cover the bowl and let rest for 20 minutes. Then deflate the dough and "round" it as shown in the video and cover.
- Let rise until double. (Note: on a hot summer day, you may want to let the dough spend some in the refrigerator so that it doesn't rise too fast.)
- When the dough is ready, empty onto a floured counter and divide into 20-30 pieces. Round each piece and dust generously with flour. Cover and let rise until double again. You may refrigerate at this point to use later in the day. Let the dough come to room temperature before using. It should stretch easily when it's ready to use. If you refrigerate the balls of dough overnight, you may need to reshape and let them rise again as the dough tends to get sticky and lose its shape over a long period of time. If you want to make the dough a day ahead of time, it's best refrigerate after step 5.
- You can substitute any uniodized salt for the Kosher salt.
- Quantity of water may fluctuate due to ambient humidity.
- Water temperature will depend on room temperature. The goal is to have a final dough temperature of around 80° F. On a hot day, room temperature or even cool water should be used in Step 3.
- For more information on yeast doughs, please see the following page: How Long Does it Take Dough to Rise.