


Susan's No-Knead Pizza Dough
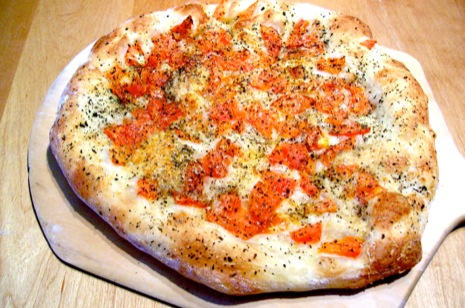
Fresh Tomato Pizzas made with No-Knead Dough
We often think of kneading as the process of pushing the dough back and forth on the table with our hands, but with this technique, we are beating the dough with a spoon to activate the gluten and using a long cool fermentation to slowly develop the gluten without us doing anything but waiting. The no-knead method requires a wetter dough so that it can be mixed with a spoon or other specialized utensil. The moist dough and long fermentation time make for a wonderful puffy crust due to the great oven spring this method facilitates. A traditional pizza dough could not be made this way as the dough is too firm. However, my standard pizza dough recipe does not require you to prepare the dough a day ahead of time. Another advantage of this method is that the yeast does not need to be 'dissolved' or pre-softened before adding. Since the dough is so moist and given a great deal of time to develop, the yeast is able to dissolve right in the dough. It is very important to shape the dough as in the video, or the dough will not stretch properly. Good luck and enjoy!
Ingredients
Yields two 10-12 inch pizzas- 1 lb. Bread flour (about 3½ cups*)
- 1½ teaspoons active dry yeast
- 2 teaspoons Kosher salt
- 1 ⅔ cups water at room temperature (I like to use spring water)
*If using measuring cups instead of a scale, stir flour first, then spoon into the cup and level off.
Method
- Measure flour (I like to use King Arthur Bread Flour) into a container that has a lid. It needs to be about 10-12 cups capacity and can be made of glass, plastic or stainless steel (don't use aluminum). I have used a soup pot with a lid quite successfully.
- Add yeast and salt.
- Pour in water and stir with a strong spoon until the ingredients are incorporated. Continue to beat with the spoon for another 2 minutes (can quit after one minute, if you're tired, but the quality of the dough won't be quite as good.)
- Cover and let rest for one hour at room temperature (less, if it is hot in the kitchen) and then place in the refrigerator overnight.
- Day 2: Take the dough out of the refrigerator and using a spoon or spatula, stir down the dough as shown in the video. Cover and let rest 15 minutes.
- Empty dough onto a floured surface and divide in half.
- Take one piece of dough and tri-fold it. Then turn the dough and tri-fold it in the other direction. This helps give strength and body to the dough. Pull the ends of the dough underneath and pinch together making a smooth ball of dough (hard to describe in words, so please watch the video). Use flour on your hands as necessary as this dough can be quite sticky!
- Repeat with the other piece of dough. Flour each piece of dough well, cover with plastic and let rest and rise. This takes about 40 minutes with a room temperature of about 72-75°F (22-24°C).
- Around this time, I will begin preheating my pizza stone to 425°F (218°C). My stone takes quite awhile to get hot throughout. Follow manufacturer's instructions for your stone. If you will be baking pizza on a sheet pan, preheat your oven as you would for any baking. For more info on baking without a stone, please see my article, No Pizza Stone, No Problem!.
- When the dough has rested and risen a bit, it's time to stretch as shown in the video. If the dough resists stretching, it may need to rest longer. Place the stretched dough on a floured peel and gently place your toppings on the dough (see note below). Gently shake the peel to make sure the dough is not sticking before taking it to the oven. Don't wait too long before peeling the dough onto the stone. The longer it sits, the more likelihood that it will stick to the peel. If using a baking sheet instead of a stone, I like to coat the bottom of the pan with about 1 tablespoon of olive oil.
- Bake for about 15 minutes or until bottom is evenly browned. If the pizza seems to be baking too fast, lower the oven to 400°F (204°C).
- To remove cooked pizza from the stone, quickly slide the peel underneath and carefully pull out of the oven. Place on a cutting board, slice and eat!
Notes:
For more information on yeast doughs, please see the following articles:
- You can substitute any salt for the Kosher salt, but it's best to use uniodized.
- Quantity of water may fluctuate due to humidity.
- The selection of toppings are endless, but keep in mind not to pile them on too thick, which can result in a gummy undercooked dough. One of my favorites is very simple. Season some extra virgin olive oil with fresh garlic (sometimes I heat it up a little and cool before using) and brush the surface of the pizza. Then top with chopped or sliced fresh tomatoes, basil (fresh if you have it), grated cheese (mozzarella and/or Romano, etc.) and ground pepper.
For more information on yeast doughs, please see the following articles:
Happy Baking!
© 2025 Susan J. Sady