Posted on

Brotforms and my No-Knead Pizza Dough!

Dough in the brotforms
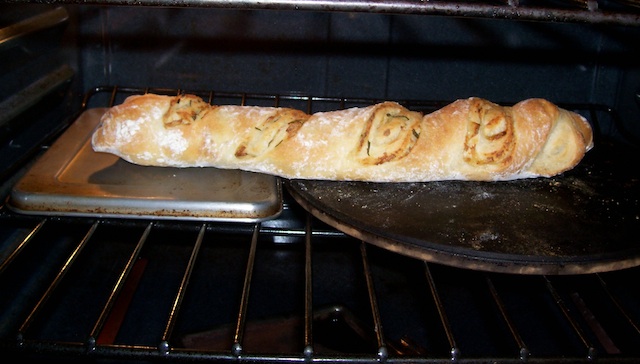
After baking

Finished product!

I finally purchased a couple of brotforms (or bannetons) to experiment with. They are rather expensive (mine were $18.99 and $20.99), but they do serve the purpose of providing structure for a rather soft dough allowing it to hold its shape as it undergoes its final proof. As a bonus, you get the pretty ridges formed by the flour dusted into the form before placing the dough inside.

I used my No-Knead pizza dough recipe the first time I used these and the results were pretty good. Follow the recipe to Step 8, but instead of putting the formed dough on the counter to rise, generously flour the brotform and place the dough inside and cover with a plastic sheet. This recipe will yield two breads (just like it yields two pizzas). After the dough has risen in the brotforms,  gently release it (upside down) onto a floured peel and place on the 425 F preheated stone. If you don’t have a pizza stone, please see my article and video,  No Pizza Stone, No Problem!  Baking with steam can help too. Click here for info.

Happy Baking!

Posted on

Homemade Frozen Yogurt

Try this simple frozen dessert:

3 cups Chobani yogurt
6 tablespoons sugar
1 teaspoon vanilla extract
sliced strawberries for topping

Just mix together the yogurt, sugar and vanilla and freeze in an ice cream maker.

I made half a batch in my fake ice cream maker (got rid of my real one years ago). I just used a large stainless steel bowl partially filled with ice and salt and then put a smaller bowl inside containing the yogurt mixture and stirred and stirred!

Posted on

Chobani Yogurt

Chobani  has been very gracious to supply yogurt for a couple of my cooking classes and I have to say that I just love their 2% plain yogurt.  It’s especially delicious combined with blue cheese in the spread shown in the picture on the right. I normally would call this a yogurt sauce, but because it is so thick and creamy, I have to call it a “spread”! It consists of a combination of crumbled blue cheese, Chobani plain 2% yogurt, fresh basil, ground pepper and fresh mint for decoration. On the right, it is shown served with homemade olive bread.
It’s also great served with Armenian sliders shown below on the grill.

Posted on 1 Comment

Summer Grill Classes

We’re very excited to be offering Summer Grill Classes 1 and 2 this summer at Cooperative Extension in Oriskany, NY. It’s an absolutely lovely location with a large wooden gazebo and vegetable, herb and flower gardens maintained by the Extension’s Master Gardeners.

These classes will be hands on and take place both in their kitchen and on the gazebo outdoors. We will be cooking on authentic charcoal grills for great flavor!

Class 1 July 19, 2012, will feature: Armenian sliders – mini seasoned and veggie laced burgers tucked inside freshly prepared grilled flat breads with caramelized onions, and cheese. We’ll top these with some freshly made yogurt sauce and tomatoes. For side dishes, we’ll prepare a delicious Israeli couscous and strawberry balsamic spinach salad. For dessert we’ll head into the kitchen to prepare flaky, buttery baklava.


Class 2 August 14, 2012, will feature: tender apricot chicken kebabs with a simply wonderful apricot sherry glaze. We’ll also make a grilled veggie whole wheat pasta salad and flavorful herbed grilled bread sticks. For dessert we’ll make our own luscious hot fudge for super-chocolatey hot fudge sundaes with freshly made whipped cream!

Posted on 3 Comments

Zucchini Carrot Pancakes!

I love zucchini and pretty soon it will be quite plentiful here in upstate New York. A great way to prepare zucchini is to make zucchini pancakes, which I have made many times in the past. However, I sought to make a version that were a little less like breakfast “pancakes” in texture.

Frying in the pan

Because zucchini has such a high moisture content, the pancakes can come out a bit soggy. Aiming for something crispier and more colorful, I came up with the following recipe. Hope you like it!

1 medium zucchini, shredded
1/4 teaspoon Kosher salt
1 medium carrot, peeled and shredded
1 egg yolk
2 tablespoons minced onion
1/4 cup all purpose flour
1/8 teaspoon coarse ground pepper
olive or vegetable oil for frying

Mix the zucchini and salt in a bowl and let sit for 5-10 minutes. Squeeze the zucchini over a colander to get out the excess liquid and place back in bowl. Add remaining ingredients and stir to incorporate. Heat frying pan and add a little oil. When hot, drop dollops (I used about 1/4 cup for each) of batter onto the pan and spread each out gently with a fork. Flip when the bottom turns brown and cook on the other side. Add more oil when necessary.

I decided to serve these with some tomato sauce I had in the fridge, but sour cream or yogurt is great too!

Posted on

Simple, quick and tasty!

Black bean salad, fried potatoes and crispy cheddar corn tortillas with oil cured olives
I needed to make something quick and simple last night and resorted to a favorite pantry bean salad. I don’t usually use a recipe, but toss canned black beans, corn, and tomatoes, (I used fire roasted, diced, but any kind will do), chopped green chiles (don’t have to use the whole can), with a combination of olive oil, vinegar and lime or lemon juice. I add some spices, usually chili powder, oregano, salt and pepper (sometimes cumin) and fresh herbs if I have them. Last night I added chives and mint from the garden. Fresh garlic and minced onion are great, but if you’re short on time, just use the powdered variety. You can also use a prepared salad dressing and spice it up a little. If you don’t have fresh lemon or lime juice on hand, just use extra vinegar – I like to use cider vinegar.

The corn tortillas are also a favorite. I happened to have some oil cured olives in the fridge, so I fried up the tortillas in a little veggie oil, topped them with the olives and a little grated cheddar cheese. Bake at 400F until cheese is melted and the tortillas are nice and crispy. For a lower calorie version, brush the tortillas with a little olive oil and bake until almost crisp, then put on the toppings and bake until the cheese is melted. The toppings can vary according to what you have on hand.
Lastly, I fried some potatoes that I had boiled whole a few days earlier. Precooked potatoes are great to have on hand- I just place them in a big pot, rinse, fill with cold water to cover, bring to a boil and simmer until fork tender. Remove the potatoes from the water, cool, and refrigerate until needed. They’ll last quite a few days in the refrigerator. To prepare, just cut into chunks or slices and fry in a little vegetable oil or butter and season (I like to use Hungarian paprika, marjoram, salt and pepper). I had fresh red pepper on hand, so I diced some and threw it in the pan with the potatoes.

Posted on

Grilled Sweet Potatoes!

I love cooking on the grill and this is the time of year for it!
As I was grilling some standard veggies…
Standard veggies

I decided to try sliced potatoes, both sweet and russets. We often roast whole potatoes by wrapping small potatoes in foil and placing them directly in or on the coals, but I had never tried sliced potatoes directly on the grill grate. They were so easy and delicious, I wanted to share the method with you:

Oil brushed potato slices on the grill

Scrub potatoes, dry and slice about 1/4 inch thick. Pat with paper towel to get rid of excess moisture. Brush with vegetable or olive oil and place over medium hot coals. Turn when the bottom has browned and puffs a little then cook on the other side. Season with salt and pepper. Absolutely delicious!

Ready to eat grilled potatoes!
Posted on 2 Comments

The Science of Pizza – for kids

I’m very happy to be taking part in Cooperative Extension of Oneida County’s Science Days -April 11, 2012. I will be teaching kids about how yeast works and what we can do to help it grow and flourish in our pizza dough. After making their own dough, the kids will get to make a variety of pizzas and have them for lunch!

One of the reasons that I love cooking and baking is my interest in science. My first college degree was in Biology (UNLV) and I thought that working in a laboratory would be the most awesome job ever. Well, I realized after several years that my favorite laboratory was the kitchen. I continued to conduct experiments of the culinary variety after leaving the less edible world of the science laboratory (mostly in water treatment) and opening our restaurant, Polonaise and later, Susan’s Cooking School. I keep a log of my experiments (recipes and methods) and make notes of what works and what doesn’t. It really is more fun than working with hydrochloric acid.

Yeast doughs are among the most complicated foods to make even though the ingredients can be quite simple. The pizza dough that I will be teaching the kids how to make at Science Days, has only six ingredients, but the complexity of how those ingredients interact with each other and the environment in which the dough is made in, is quite amazing. Transforming simple ingredients into yeast breads or pizza is the best kind of experimentation ever!

Science Days Flyer
Posted on

Pizza Stone Extension

When baking French bread or other long-style yeast breads, a round pizza stone can be a problem.  The ends of the loaf may hang over the edges of your stone and/or you may just end up making shorter loaves to eliminate the problem. Below are some pictures that show one solution. I used an inverted small baking pan that came with a toaster oven (by the way, I save the pans from old discarded toaster ovens) and laid it next to my stone to provide an extension for my Rosemary Roasted Garlic Bread. It worked quite well and I hope it may work for you too!

Return to Susan’s Cooking School