The corn tortillas are also a favorite. I happened to have some oil cured olives in the fridge, so I fried up the tortillas in a little veggie oil, topped them with the olives and a little grated cheddar cheese. Bake at 400F until cheese is melted and the tortillas are nice and crispy. For a lower calorie version, brush the tortillas with a little olive oil and bake until almost crisp, then put on the toppings and bake until the cheese is melted. The toppings can vary according to what you have on hand.
Lastly, I fried some potatoes that I had boiled whole a few days earlier. Precooked potatoes are great to have on hand- I just place them in a big pot, rinse, fill with cold water to cover, bring to a boil and simmer until fork tender. Remove the potatoes from the water, cool, and refrigerate until needed. They’ll last quite a few days in the refrigerator. To prepare, just cut into chunks or slices and fry in a little vegetable oil or butter and season (I like to use Hungarian paprika, marjoram, salt and pepper). I had fresh red pepper on hand, so I diced some and threw it in the pan with the potatoes.
Author: Susan Sady
Grilled Sweet Potatoes!
 |
| Standard veggies |
I decided to try sliced potatoes, both sweet and russets. We often roast whole potatoes by wrapping small potatoes in foil and placing them directly in or on the coals, but I had never tried sliced potatoes directly on the grill grate. They were so easy and delicious, I wanted to share the method with you:
 |
||
| Oil brushed potato slices on the grill |
Scrub potatoes, dry and slice about 1/4 inch thick. Pat with paper towel to get rid of excess moisture. Brush with vegetable or olive oil and place over medium hot coals. Turn when the bottom has browned and puffs a little then cook on the other side. Season with salt and pepper. Absolutely delicious!
 |
| Ready to eat grilled potatoes! |
The Science of Pizza – for kids
I’m very happy to be taking part in Cooperative Extension of Oneida County’s Science Days -April 11, 2012. I will be teaching kids about how yeast works and what we can do to help it grow and flourish in our pizza dough. After making their own dough, the kids will get to make a variety of pizzas and have them for lunch!
One of the reasons that I love cooking and baking is my interest in science. My first college degree was in Biology (UNLV) and I thought that working in a laboratory would be the most awesome job ever. Well, I realized after several years that my favorite laboratory was the kitchen. I continued to conduct experiments of the culinary variety after leaving the less edible world of the science laboratory (mostly in water treatment) and opening our restaurant, Polonaise and later, Susan’s Cooking School. I keep a log of my experiments (recipes and methods) and make notes of what works and what doesn’t. It really is more fun than working with hydrochloric acid.
Yeast doughs are among the most complicated foods to make even though the ingredients can be quite simple. The pizza dough that I will be teaching the kids how to make at Science Days, has only six ingredients, but the complexity of how those ingredients interact with each other and the environment in which the dough is made in, is quite amazing. Transforming simple ingredients into yeast breads or pizza is the best kind of experimentation ever!
 |
| Science Days Flyer |
French Bread FAQs

I get many questions regarding my video and recipe on how to make French bread. I have posted some of them below. This article will be a work in progress as I intend to regularly add information to it.
Please keep in mind that some things are difficult to learn online and that I hope some of you reading this will have the opportunity to learn in person how to make French Bread and many other complicated foods in a live setting. I would suggest making pizza out of my pizza dough before attempting French bread as it will be less frustrating, but still delicious!

Please check my articles on How Long Does It Take Dough To Rise and Pizza Dough FAQS for more useful information on making yeast doughs.
How do you create steam in the oven?
I keep an old metal pan on the bottom of my oven. It’s actually a baking pan from a previously used toaster oven. I have used an old cookie sheet, too. The pan will not be usable for any thing else once you use it for making steam. I let the pan preheat in the oven along with my stone. As a matter of fact, I just leave mine in the oven all of the time. When the loaves are ready to bake, I place them on the stone and quickly pour about 1/2 cup boiling hot water into the pan which creates a bunch of steam. I then immediately close the oven door. The steam helps the loaves to rise more in the oven and aids in crust development. This may or may not be a good idea in your home oven. I would not recommend this method if you have an electric oven, as there as there are electric elements on the floor of the oven. With an electric oven, it may work to place the pan on a rack below your stone. Please use caution and remember that the steam is very hot! Also, keep in mind that you are putting a lot of moisture in your oven that could cause things to rust. Please use this method at your own risk.
Can the sponge be proofed for a longer time, perhaps overnight?
Yes, you can ferment the sponge longer. You can use less yeast or for a slower ferment or place the sponge in a cooler location or a combination of both methods. Keep in mind that a long fermentation may create a sort of sour dough – it can be delicious, but a little different. You may need to experiment to find what works best for you. My recipe is a good one to play around with since some new yeast and food is put into the dough after the initial fermentation.

What about the cloth (baker’s couche) that you use to proof the loaves of bread before baking?
This material is 100% untreated, unbleached linen (made from flax fibers). I purchased mine from King Arthur Flour, but it came with raw edges that were unraveling a bit, so hemmed it (actually my Mom did the sewing) with a serger sewing machine. It is not supposed to be washed as the material will lose it’s natural non-stick properties therefor, it should only be used for leans doughs (no fat, dairy or eggs). I have experimented with duck cotton canvas that I purchased at a fabric store. It works fairly well and can be washed, but it is not as stiff as the couche and you may need to use more flour to prevent sticking.
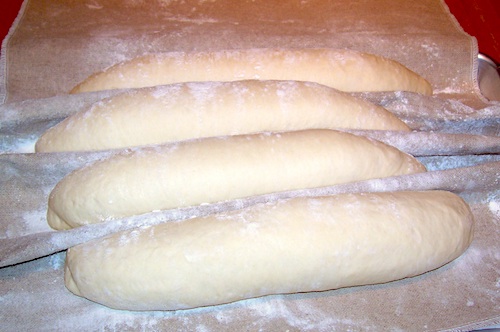
The purpose of proofing the breads this way is that the fabric gently holds the dough in the baguette shape, allowing it to rise upwards, rather than spreading out. The natural oils in the couche also help prevent the dough from drying out, however I often put a sheet of plastic over the dough to give it extra protection. If you want to simulate a couche without spending any money, I have had luck using an old, clean cotton tablecloth, double or quadruple folded for sturdiness.
Why doesn’t my French bread come out like yours?
It is impossible for me to completely address this question in a virtual world. While French bread is made from simple ingredients, the process of making, shaping and baking the dough has many places where mistakes can be made. The most difficult part of bread making for most of my students is in the proper shaping of the dough, especially the need to make the loaves nice and tight before their final proofing. It may take some time to get the technique down, so keep trying and be patient. After all, bread isn’t that expensive to make, so practice away! In addition, French bread is one of the more difficult breads to make, because is is made with a very lean dough – a dough containing no fat. A lean dough has a tendency to quickly form a crust in the oven, preventing the bread from achieving “oven spring or rise” giving lightness and a lovely crust to the bread. Following all of the steps properly will help.
Can I refrigerate the shaped loaves and bake the following day?
Once the dough has been shaped into loaves, it is best to proof and bake right away. If you want to bake on the following day, store the dough in the refrigerator after it has risen (after Step 5 – recipe on my web site). For the overnight method, don’t let the dough rise until fully doubled in volume, because it may get over fermented. It will continue rising in the refrigerator, only more slowly.
Can I use instant yeast or fresh yeast instead of active dry yeast?
You can use fresh yeast, about .25 ounces (about 1.25 teaspoons or 6 ml) each for the sponge and then the dough (total of 0.5 ounces). Instant yeast would be OK, but it is usually the fast rising kind which I don’t like. Fast is not better when it comes to French bread.
Why don’t you use oil in your dough?
Oil will change the texture of the bread (especially the crust) and is not a traditional component of French Bread. You do not need to coat the bowl with oil before placing the dough to rise. It’s actually beneficial for the dough to be able to grab onto the sides of the bowl when expanding. It’s easier to make breads that contain oil, because the dough’s surface doesn’t dry out as quickly in the oven. If you’re making French Bread at home- you’re not into “easy” to begin with, right?
How can I stop my bread from drying out quickly?
I always bag and freeze all but the loaves that we’re going to eat right away. Lean breads, like French bread, tend to dry out quickly. You can freshen them up by heating in a 350-400F oven. They’ll get crispy on the outside with a moist interior.
Happy Baking!
New Recipes at Susan’sCookingSchool.com
We were happy to be a part of the 4th annual Make Over My Heart festival held at the Radisson Hotel in downtown Utica, NY on February 4, 2012. I offered two one-half hour workshops demonstrating how to make Mediterranean Chickpea Salad and Sun-dried Tomato Basil Bread Sticks. In 30 minutes it’s impossible to demonstrate scratch bread making from beginning to end, but we covered how to roll and fill the dough and attendees got to sample a bit of each during the workshop. Make Over My Heart is a great event promoting a heart healthy lifestyle for women with lots of activities throughout the day. We were happy to be one of those activities! The complete recipe for both of these great foods is now available to all, including step by step (with pictures) instructions on filling and shaping the bread sticks.
 |
| Mediterranean Chickpea Salad and Sun-dried Tomato Basil Bread Sticks |
Susan’s Classes at MVCC Spring 2012!
Below are classes that I will be offering at MVCC this semester. See MVCC’s Community Education site for more info and to download their Spring 2012 Catalog. Hope to see you in class!
Pizza Stone Extension
When baking French bread or other long-style yeast breads, a round pizza stone can be a problem. The ends of the loaf may hang over the edges of your stone and/or you may just end up making shorter loaves to eliminate the problem. Below are some pictures that show one solution. I used an inverted small baking pan that came with a toaster oven (by the way, I save the pans from old discarded toaster ovens) and laid it next to my stone to provide an extension for my Rosemary Roasted Garlic Bread. It worked quite well and I hope it may work for you too!
Pierogi Time!
 |
| Learn to make Pierogi like a pro – Buy DVD only $9.50 on Amazon! |
Good News! My How to Make Pierogi DVD is now available on Amazon.com, both as a VOD (Video On Demand) and as a DVD. I have also created a Pierogi page on my website with complete recipes for making Potato and Cheese, and Sauerkraut and Mushroom Pierogi.
Enjoy making pierogi for and with your friends and family!
No Pizza Stone? No Problem!

I’m often asked whether it is necessary to use a pizza stone for making pizzas and breads, so I made a video (below) to address that question. The short answer is no, but let me explain further. The purpose of using a stone for baking pizzas and artisan style breads is that the preheated stone applies direct (and correct) heat to the bottom of your pizza or bread dough allowing it to rise again in the oven, before a crust is formed on your dough, preventing the dough from expanding anymore. You may think, well, my oven is hot, so why do I need the stone for heat? The reason is, that when you open the oven door on a household oven, a great amount of heat is lost immediately into the kitchen. In addition, if your bread is on a pan, it takes time for the heat to travel through the metal to get to the bottom of the loaf. During this time, a crust is forming on the dough, preventing it from rising further. The crust of lean (not much fat) yeast doughs, like french bread, firm up quickly in the oven and the resulting bread may be dense if the dough didn’t get a chance to “spring” during the early baking process. (Steam also helps. See my How to Make French Bread video and recipe for more on that subject). Placing the dough directly on a preheated surface provides instant heat to the bread or pizza dough enabling it to rise before a crust is formed. With pizza, this is not as crucial, because the dough is usually covered with toppings that keep the dough moist allowing for oven spring to occur. However, the direct heat of the stone will give your pizza a little extra boost. (I also enjoy baking my pizzas in an olive oiled sheet pan, but that’s described here.) See my pizza dough video and recipe.
So what are some alternatives to baking with a pizza stone?
Let me say one more thing about the pizza stone – it takes a long time to sufficiently preheat. I have two different kinds of pizza stones and they both take 30-45 minutes of preheating to get hot enough to bake on. You can’t assume that the stone is the right temperature just because the oven temperature is. The stone takes longer to heat than the air in the oven, which is what the oven thermometer is reading. I usually bake my hearth style breads and pizzas between 400-425 F and will often turn my oven up higher (to preheat the stone a little quicker) and then bring it back down to the desired temperature. The reason I mention this here, is that the good thing about the stone alternatives shown in my video/slideshow below, is that they all preheat much quicker than the pizza stone. Basically, by the time the oven is the right temperature, so is the baking surface. However, one great advantage of using a pizza stone (I guess that’s two more things), is that it doesn’t need to be washed after use. With some of my alternative methods, that’s not the case.
I give several methods in the video that mimic baking on a stone that provide satisfactory results, as you can see in the finished products. This doesn’t mean that you shouldn’t get a stone – they’re not very expensive, at least mine weren’t. They do last a long time and provide better heat retention in the oven than my alternative methods. Even though I own two baking stones, I enjoy experimenting with other methods, especially if I need to bake/teach somewhere that would necessitate my having to drag along my own stone! Well, enjoy the video and I hope you will find some suggestions that will be helpful to you. This video has closed captioning.
Grilled Sweet Corn
| It looks a little gross on the outside, but on the inside, the corn is perfectly done! |
Fresh corn on the cob is a favorite treat in upstate New York this time of year. I purchased some at Twin Orchards Farms in New Hartford yesterday and it was absolutely a delight! What I love about the grilling method is that nothing at all is added or taken away – the corn is just roasted in it’s own husk. I just peeled back the husk to remove the silky strands and then pulled the leaves back over the kernels. I used a strip of foil to wrap around the narrow end to hold the husk together during cooking (can see the foil in the picture above). The corn was placed on a rack over medium coals (Weber Grill) and turned occasionally until done. I didn’t time the process, but I’m guessing 10-15 minutes. Peel back the husk and devour. We didn’t need to add salt or butter – the corn was super sweet, crunchy and delicious!
Warning: Use caution when using this method as the leaves may start burning. Some recommend soaking the corn in their husks before grilling to prevent this.


